Showing posts with label burp cloth. Show all posts

Friday, July 26, 2013

Bears, Beards, and Snails

My husband’s and my friends are getting ready to welcome their first baby, a boy, this fall. I got a super early start on their baby gift because who knows what I will have time for once school and soccer season start back up again in a few weeks.

Here’s a look at the whole package.barry and bianca's baby gift 005

This is a travel changing pad made with laminated fabric on the outside and fuzzy terry cloth on the inside. I didn’t get a picture of it opened up, but it has a pocket on the inside to hold a diaper or two and a small pack of wipes.
barry and bianca's baby gift 006

The onesie, bib, and burp cloth are all coordinating with cute snail fabric.
barry and bianca's baby gift 007

The crocheted bear hat is my favorite and was a breeze to whip up. It only took an hour from start to finish.
  barry and bianca's baby gift 009

My husband specifically requested that I make a bearded beanie as a funny addition to the package. I found a great tutorial here:

This is a picture from her blog post so you can get an idea of what it looks like with a baby in it. SO STINKIN’ FUNNY!

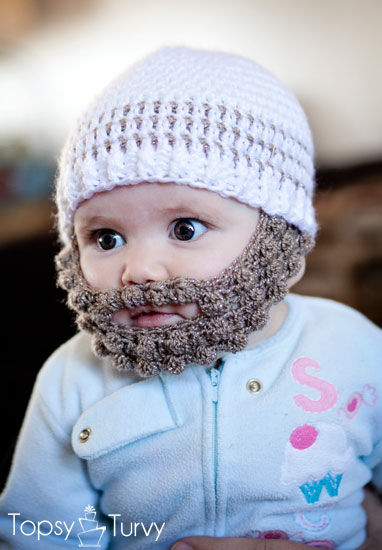
I used a receiving blanket to wrap it all up in and it’s ready to be put in the mail. 
barry and bianca's baby gift 022

Thursday, February 7, 2013

Angela’s baby gift

After having three boys, a very dear friend of mine will be having her first baby girl soon. I am so excited for her! I jumped on the opportunity to make some fun girly baby stuff.
Skirt, embellished onesie, headband, and burp cloth073
Dress, diaper cover and shoes

074

I LOVE the shoes!
077

Bib081

Hairclips
085

Of course I had to make a quilt.
092

Close-ups
090

099

105

Back of the quilt


093

The fabric is “The Simple Life” by Tasha Noel from Riley Blake. I hand quilted it with Size 8 Pearl Cotton Thread

Saturday, July 14, 2012

Baby Boy Shower

A friend and I hosted a baby shower for another friend. Her gift also served as a shower decoration. I made the bib, blanket, onesie, and burp cloth. The pants and the shoes on the cake were on clearance at Target. 024

025026027029038

I didn’t have the time or energy to make edible shoes, so I compromised and used real ones. Even after many reassurances that they were clean and new, my kids were pretty concerned about the shoes getting the cake dirty. I was more concerned about the cake getting the new shoes dirty, but everything worked out just fine.

Wednesday, April 25, 2012

More baby stuff

Just a few onesies, burpcloths, a bib, and a headband that I made for baby shower decorations, they were also my gift to the mom to be.

006011014

Thursday, April 12, 2012

Baby Boom

My friends have been busy making babies lately and I been busy trying to keep up on making their baby gifts. I also had a good friend who hired me to make her husband’s client’s wife some onesies for a baby gift. What a huge compliment! When it comes to crafting, baby gifts are my absolute favorite thing to do so I have had a lot of fun coming up with all of the following baby gifts:

072078

For the following onesie, I dyed it using black tea. I just soaked it in the hot tea until it was the shade I wanted it. I don’t drink tea, but I had seen on Pinterest that it helps immediately sooth sunburn so I bought some to treat the sunburn I acquired over Spring Break. In case you were wondering, it didn’t do a thing for my sunburn, but it works great for antiquing onesies. 073

For this onesie, I decided to try embroidery again. It turned out better than the first time I tried it a few months ago. I think the embroidered owl is sweet.085

103

Here’s the back of the onesie.106

And although it’s not baby related, I’m throwing in a picture of the newest sling I made for my broken armed monkey. She loves Dr. Seuss and I have some scraps left over from the Dr. Seuss quilt I am making the twins’ kindergarten teacher so I made her day when she came home to this:

083

097

Saturday, January 28, 2012

Pinwheels and Prairie Points

A really good friend of mine back in Las Vegas is getting ready to welcome a new baby girl into her family. I am so sad I can’t be there for her baby shower, but I enjoyed spending some time these last few weeks making her baby gift. Here is the coordinating onesie, skirt, shoes, and burp cloth I sent her.
106
Gotta love the shoes!
104
Here is the blanket/quilt I made. I don’t know if I can technically call it a quilt because it only has a top and a backing, but no middle batting layer. I used a nice warm fuzzy backing so I didn’t think batting was necessary. The top is pieced and I bound the edges like I would do a quilt.
111110
I have never done prairie points on a quilt before and I absolutely love them on this quilt. They were definitely worth the extra effort.
 112
Her baby shower is a book shower and everyone is supposed to bring books for the new baby. I love the idea, especially for a mom who is not a first timer. Although I never pass the opportunity to make fun baby items for my friends, I also wanted to stick with the theme of the shower. I found this vintage book from 1960 at a little bookstore near downtown Orlando. I loved this story as a kid and it didn’t hurt that the colors/fabrics in the quilt totally remind me of Raggedy Ann and Andy. Other than a little wear on the corners it was in amazing condition, there is no writing or torn pages in the book, and the colors in the photos are still vibrant. It was an awesome find!
077090076


I'm linking up at:

Oopsey Daisy
Link Partyhttp://www.thegrantlife.com/search/label/financial%20friday


Sunday, November 6, 2011

Baby Girl Gift and Chevron Striped Quilt Top How To

039
Another friend is getting ready for the arrival of a baby girl and I’ve just finished her gift. I did a simple burp cloth and onesie and made a couple of headbands too. My favorite part is the chevron striped quilt I made. I love the way it turned out.
030
So cute, right? I did a scrappy back because I didn’t have enough of one fabric to do a solid one. I just used the fabric strips I had left from the front mixed in with some white flannel that I had lying around and I think it turned out really cute too. You can kind of see from the back that I just outlined the chevron stripes for my quilting.
038
I didn’t have a pattern for the chevron stripes, but they are really easy to do. Here is a basic rundown on how I did mine if you are interested and already familiar with the basics of quilting. It would be an easy beginner project.
  • Cut your fabric into 4” strips, then cut the strips into 4” squares. Obviously you can make your squares bigger or smaller if you want bigger or smaller stripes. You will need at least 2 different contrasting colors of fabrics.
001
  • Cut your squares in half to make half-square triangles.
004
  • Sew the light triangles to the dark triangles, right sides together, along the long side of the triangles. Press your seams toward the darker fabric.
006
  • Arrange your newly sewn squares into the layout as show in the photo below:
007
  • Sew the top two squares together for all of your blocks. Then sew the bottom two squares together. Press the top seam in the opposite direction that you press the bottom seam.
008
  • Sew the top rectangles to the bottom rectangles, press the seam, and you have your finished quilt squares.
009
  • Sew your squares together to make rows. Make sure you keep the squares all facing the same direction when you do this or the pattern won’t turn out right. Press all your seams for each row in the same direction, but alternate the direction of the seam for each row.
010
  • Sew your rows together, again making sure that the rows are all facing the same direction, press your seams anyway you want, and your quilt top is done.
019
Now the real work of actually quilting and binding the quilt begins. Have fun!

I am linking up at:
http://tatertotsandjello.com/2011

Link Party